


Root Galaxy S3 (AT&T) SGH-I747 on Android 4.1.2 Jelly Bean Firmware

Samsung Galaxy S3 (AT&T) SGH-I747 users who have already updated their devices with Android 4.1.2 Jelly Bean, may root their devices using the tutorial below.
This tutorial uses CF-Auto-Root file released by recognised XDA Developers, Chainfire. The CF-Auto-Root file allowing Galaxy S3 users to root their devices easily without depending on the firmware. It completely supports Android 4.1.2 Jelly Bean and future firmware as well. Head over to the CF-Auto-Root main thread to learn more about the root method.
Note: Using this root increases your flash counter. The flash counter keeps track of how many custom firmwares you have flashed, as this voids warranty. Triangle Away can be used to reset the flash counter after installing CF-Auto-Root.
Disclaimer: Rooting voids the warranty of your device. We and the developer of this rooting procedures shall not be held responsible if any undesirable outcomes may happen to your device. use of this root guide is solely at your own risk!
Pre-requisites
1. Install USB Drivers for Samsung Galaxy S3 on the computer.
2. Enable USB Debugging Mode on the phone by navigating to Settings >> Developer Options.
3. Make a backup of all your important data before following the guide.
4. Ensure the battery of the phone is charged more than 80 percent.
5. The CF-Auto-Root file works only on Samsung Galaxy S3 (AT&T) SGH-I747. Applying this to any incorrect variant might brick the device. Verify the model number of the Galaxy S3 by navigating to Settings >> About Phone.
File Required
1. CF-Auto-Root (Mirror Link) for Galaxy S3 (AT&T) SGH-I747 (CF-Auto-Root-d2att-d2uc-samsungsghi747.zip)
2. Odin 3.07
Steps to Root Galaxy S3 (AT&T) SGH-I747 Running on Android 4.1.2 Jelly Bean Firmware
Step 1: Extract CF-Auto-Root and Odin 3.07 files using winrar/7zip/winzip or any other extracting tool.
Step 2: Switch off the Galaxy S3. Then boot the device into Download Mode by pressing and holding Volume Down, Home and Power buttons together until a construction Android robot icon with a warning triangle appears on screen. Now press the Volume Up button to enter Download Mode.
Step 3: Launch Odin on the computer as an Administrator.
Step 4: Connect the Galaxy S3 to the computer using USB cable while it is in the Download Mode. Wait until Odin detects the device. When the device is connected successfully, the ID: COM box will turn blue with the COM port number. Additionally, the successful connected will be indicated by a message saying Added.
Note: If the Added message does not appear, then try re-install USB drivers or changing the port on the computer.
Step 5: In Odin, click the PDA button and select the CF-Auto-Root-d2att-d2uc-samsungsghi747.tar.md5 file.
Step 6: Verify that Auto Reboot and F.Reset Time checkboxes are selected in Odin. Also, ensure the Re-Partition option is not selected.
Step 7: Double-check and click Start button in Odin. The installation process will now begin.
Step 8: Once the installation process is completed, your phone will restart and soon you will see a PASS message with green background in the left-most box at the very top of the Odin. You can now unplug the USB cable to disconnect your device from computer.
Samsung Galaxy S3 (AT&T) SGH-I747 running on Android 4.1.2 Jelly Bean firmware is now rooted successfully. You can now install any app that requires root permission. Verify the root status of the device by downloading Root Checker app from Google Play Store.
JURASSIC SAMSUNG GALAXY YOUNG TOOL
JURASSIC SAMSUNG GALAXY YOUNG TOOL

SIM UNLOCK/RELOCK
CLEAR PIN
CLEAR PASSWORD
CLEAR PATTERN
CLEAR PIN
CLEAR PASSWORD
CLEAR PATTERN
WOW !!!!! JellyBean 4.2.4 Q88 AutoTouch, AutoCamera, AutoGsensor

Auto Touch
Auto Camera
G-Sensor Auto
Link Download :
http://www.mediafire.com/download/aj...AutoDriver.rar
How to root Samsung Galaxy Note 3 the easy way

Download the latest version of the ODIN flashing software for Samsung handsets and the latest USB drivers if your phone doesn't get recognized by your computer, or visit Daerragh's ODIN thread from the source link below.
SM-N900 (International Exynos): CF-Auto-Root-ha3g-ha3gxx-smn900.zip
PROSEDURE :
- Download and unzip the respective CF-Auto-Root-....zip file for your device- If you end up with a recovery.img and cache.img file, you've extracted twice. You need to end up with a .tar.md5 file - don't extract that one
- (USB) Disconnect your phone from your computer
- Start Odin3-vX.X.exe
- Click the PDA button, and select CF-Auto-Root-....tar.md5
- Put your phone in download mode (turn off phone, then hold VolDown+Home+Power to boot - if it asks you to press a button to continue, press the listed button, or run adb reboot downloadcommand)
- (USB) Connect the phone to your computer
- Make sure Repartition is NOT checked
- Click the Start button
- Wait for Android to boot
Samsung S5233 100% Tested Flash File

Samsung S5233 100% Tested Flash File.
When You Try Your Set With More Region File With Flash
But Not Done Same Condition Steel Show On Dish-Ply Samsung Logo Set Not
Run.
How to upgrade - Flashing Samsung C3520 using Flash_Loader

Preparation Steb by Steb :
- download C3520_Flash_Loader_7.5.4 CSC v0.2_Citrus_Lite disini
- download C3520XXKJ7_OXAKJ4 disini
- driver samsung c3520 <kalau gak ada pakai samsung kies Disini & Disini & Disini
- extrak loader dan firmware yang sudah di download diats
open Flash_Loader_7.5.4 CSC v0.2_Citrus_Lite
open bfloader,nanti akan keluar seperti gambar di atas.
klik "setmodel" pilih "C3520_Citrus_Setting_v00.mdl"
klik "main partition" klik "browse" arahkan ke firmware yang sudah di download tadi,contoh:D:\Firmware HP\Samsung\New folder (2)\C320XXKJ7_OXAKJ4\C3520XAKJ7\C3520XXKJ7_BIN\C3520OPEN.ptt terus klik ok
klik "csc" klik "browse" arahkan ke firmware yang sudah di download tadi,contoh:D:\Firmware HP\Samsung\New folder (2)\C320XXKJ7_OXAKJ4\C3520XAKJ7\C3520OXAKJ4_CSC\C3520OPEN.ptt terus klik ok
klik tombol "start"
masukan batre hp tekan dan tahan tombol angka 1 dan 2
pasang konektor usb ke hp
proses berjalan tunggu sampai download setatus berwarna hijau,dan selesai
how to upgrade and flashing Samsung B3210 without cable modif
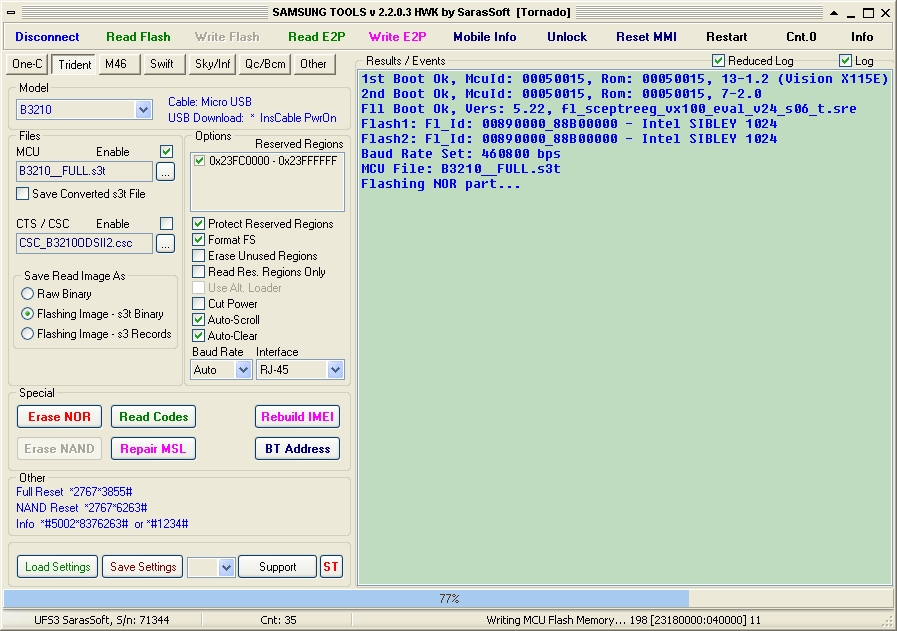
Maybe what I mean by the title Tread is already understood .
this is what I do when my Usb Cable Modif no or missing
and User waiting for sure.
inevitably there must be brief , as follows without Modif cable .
essentially the same goal to get Flashing


How to upgrade - Flashing Samsung C3312 Delux using Flashtool
How to upgrade - Flashing Samsung C3312 Delux using Flashtool :

In a few moments you
are going to know how you are going to update your firmware.
Some may ask that "Why i should
take my own risk of spoiling my mobile .
Here are some reasons that why you should update your firmware.
Here are some reasons that why you should update your firmware.
- Service Support for Samsung Mobiles are very bad nowdays.
- Upgrading Firmware in the Service center costs you even in the Warranty period.
- You can get choco cooky font in your mobile at free of cost.
- Upgrading the firmware makes your internet experience better.
- Upgrading a firmware of a mobile is not at all a grand work.
- A basic knowledge of computer operation is enough.
- Here are the softwares you need to flash your Samsung Champ Deluxe C3312.Preparation prior to upgradde
1. WinRAR [To Extract the Firmware Downloaded]. Click Here to DownloadLanguage Indonesia .Click Here To Download
2. A FlashTool EM_XMM2150.Click here to Download Flasher
3. Firmware Files [.rar format to be extracted]. Click here to download Firmware FileStep by step / tutorial
STEP-1:
You should now prepare your mobile to enter to the boot mode..
Before Entering to the Boot Mode.1. Prepare a backup of your personal files in the phone memory..
2. To Create a backup go to
Menu --> Settings --> Backup Manager --> Select the Backup you want.Now when all the backup is overswitch off your mobile.
Now Remove your back panel cover and connect your USB Cable.
Immediatly press "VOLUME DOWN KEY" + "LOCK KEY" Simultaneously.Now your Phone Enters the Boot Mode and You see a Image of a Mobile Phone with a Arrow Facing that mobile.STEP-2:
Now Open the Flasher [FlashTool_E2.exe]
Ignore the Error Messages and Click OK.
The window looks like below.
Now add the Files you have downloaded as the Firmware Files after extracting using the WinRAR software.
Now Click on the Next Button.. Your Window looks like below.

 Now Click on Start USB1 and Your Mobile Starts Flashing if your phone fails flashing try using other Methods in Listing Box
Please Vidios Tutorial For Download In the following links :

Click to dowenload Here


Galaxy S3 Stock Firmware
Here is Galaxy S3 updated firmware download link list and info on how
to flash into Galaxy S3. Always remember your old firmware details, so
that you can revert it back once encountered some issues when flashing.
You can check your device product code by typing *2767*4387264636#. Each Samsung Galaxy S3 devices had a unique product code varies from each country of origin. It does not always mean that you lived in the UK you always got the XEU version, it may also happen that your device is already unlocked and purchased from other regions.
How To Check Galaxy S3 firmware information:
1. You may first check your device current firmware information by,
Model Number: Go to Settings > About > Model Number Example: GT-I9300
Android Version: Go to Settings > About > Android Version Example: Android 4.0.4 Ice Cream Sandwich
Product Code: Type Keypad > *2767*4387264636# Example: GT-I9300xxxXSA
Firmware Versions: TypwKeypad > *#1234#
Example:
PDA: I9300XXALE8
PHONE: I9300XXLE8
CSC: I9300XSAALE6
Kernel Version: Setting > About > Kernel Version Example: 2.6.35.7-I9300XWKE2-CL187606 root @DELL101#2
Download Galaxy S3 Latest Firmware Link
Here is the latest Samsung Galaxy S3 firmware download link. You can download the related firmware as listed below form here ( Galaxy S3 and Note ROM , update Galaxy S3 firmware or samsung-updates.com ), As we mention as above, you can check your firmware version by type on the Keypad
> *#1234# . Or you can check at Settings > About Device and refer
to the baseband version. For example: I9300DXLE8 mean:
listed below form here ( Galaxy S3 and Note ROM , update Galaxy S3 firmware or samsung-updates.com ), As we mention as above, you can check your firmware version by type on the Keypad
> *#1234# . Or you can check at Settings > About Device and refer
to the baseband version. For example: I9300DXLE8 mean:
I9300 = Model
DX = Region code or Network Code
LE = Release-Date of the Firmware
8 = Revision
Please download the latest specific firmware files that match to your device information – country and carrier network.
Region Codes:
BD = Cyprus, Griechenland
BH = Mitteleuropäisch
CE = Niederlande, Belgien
CP = Finland
DB = Vietnam
DC = Thailand
DD = India
DT = Australien
DX = Indonesia, Malaysia, Philippines, Singapore, Vietnam
DZ = Malaysia, Singapore
JA = Süd Africa
JC = Algeria, Morocco, Nigeria, South Africa, Tunisia
JP = Algeria, Egypt, Iran, Iraq, Kuwait, Morocco, Nigeria, Oman, Pakistan, Saudi Arabia, South Africa, Syria, Tunisia, Turkey
MT = Schweiz
PO = Frankreich
XA = Österreich, France, Italien, Schweiz, Niederlande, England
XB = Dänemark, Schweden, Norwegen
XC = Portugal, Spanien
XD = Croatia, Czech, Hungary, Slovakia
XE = Bulgaria, Estonia, Kazakhstan, Latvia, Lithuania, Russia, Ukraine (Eastern Europe)
XF = Bulgaria, Croatia, Romania
XG = unter anderen Deutschland
XX = Österreich, Belgien, Frankreich, Deutschland, Ungarn, Italien, Spanien, United Kingdom (Western Europe)
XP = Europe (English, German, French, Italian, Spanish, Nederlands, Polski, Portugues and Turkish)
XW = UK, Italy, Germany, France, Australia, Netherlands, Belgium, Switzerland
ZC = China, Hong Kong
ZH = Hong Kong
ZT = Taiwan
How To Update/Flash Galaxy S3 Firmware Via Odin
Here, below is the general instruction on how to flash firmware into Galaxy S3 via Odin.
1. Download and install Samsung Kies on your PC. Restart your PC after installation complete.
2. Download the S3 firmware (.zip) and then Extract the file (now you will get .tar file) into your PC.
2. Go Setting >Developers option to enable USB Debuging on your Galaxy S3 and then Power off your Galaxy S3.
3. Press your Galaxy volume Down+ Power Button + Home Button to enter Downloading Mode.
4. Open Odin (download Link) on PC, then connect your S3 to PC via USB connect USB.
5. Make sure Odin Detect your Galaxy S3 (How to know).
6. Press Odin PDA, then select the downloaded firmware (.tar).
7. Now click Odin Start button to Flash the firmware into your galaxy S3.
8. That all! Your Phone will reboot once the firmware complete flash into your S3.

[Read More...]
You can check your device product code by typing *2767*4387264636#. Each Samsung Galaxy S3 devices had a unique product code varies from each country of origin. It does not always mean that you lived in the UK you always got the XEU version, it may also happen that your device is already unlocked and purchased from other regions.
How To Check Galaxy S3 firmware information:
1. You may first check your device current firmware information by,
Model Number: Go to Settings > About > Model Number Example: GT-I9300
Android Version: Go to Settings > About > Android Version Example: Android 4.0.4 Ice Cream Sandwich
Product Code: Type Keypad > *2767*4387264636# Example: GT-I9300xxxXSA
Firmware Versions: TypwKeypad > *#1234#
Example:
PDA: I9300XXALE8
PHONE: I9300XXLE8
CSC: I9300XSAALE6
Kernel Version: Setting > About > Kernel Version Example: 2.6.35.7-I9300XWKE2-CL187606 root @DELL101#2
Download Galaxy S3 Latest Firmware Link
Here is the latest Samsung Galaxy S3 firmware download link. You can download the related firmware as
listed below form here ( Galaxy S3 and Note ROM , update Galaxy S3 firmware or samsung-updates.com ), As we mention as above, you can check your firmware version by type on the Keypad
> *#1234# . Or you can check at Settings > About Device and refer
to the baseband version. For example: I9300DXLE8 mean:I9300 = Model
DX = Region code or Network Code
LE = Release-Date of the Firmware
8 = Revision
Please download the latest specific firmware files that match to your device information – country and carrier network.
Region Codes:
BD = Cyprus, Griechenland
BH = Mitteleuropäisch
CE = Niederlande, Belgien
CP = Finland
DB = Vietnam
DC = Thailand
DD = India
DT = Australien
DX = Indonesia, Malaysia, Philippines, Singapore, Vietnam
DZ = Malaysia, Singapore
JA = Süd Africa
JC = Algeria, Morocco, Nigeria, South Africa, Tunisia
JP = Algeria, Egypt, Iran, Iraq, Kuwait, Morocco, Nigeria, Oman, Pakistan, Saudi Arabia, South Africa, Syria, Tunisia, Turkey
MT = Schweiz
PO = Frankreich
XA = Österreich, France, Italien, Schweiz, Niederlande, England
XB = Dänemark, Schweden, Norwegen
XC = Portugal, Spanien
XD = Croatia, Czech, Hungary, Slovakia
XE = Bulgaria, Estonia, Kazakhstan, Latvia, Lithuania, Russia, Ukraine (Eastern Europe)
XF = Bulgaria, Croatia, Romania
XG = unter anderen Deutschland
XX = Österreich, Belgien, Frankreich, Deutschland, Ungarn, Italien, Spanien, United Kingdom (Western Europe)
XP = Europe (English, German, French, Italian, Spanish, Nederlands, Polski, Portugues and Turkish)
XW = UK, Italy, Germany, France, Australia, Netherlands, Belgium, Switzerland
ZC = China, Hong Kong
ZH = Hong Kong
ZT = Taiwan
How To Update/Flash Galaxy S3 Firmware Via Odin
Here, below is the general instruction on how to flash firmware into Galaxy S3 via Odin.
1. Download and install Samsung Kies on your PC. Restart your PC after installation complete.
2. Download the S3 firmware (.zip) and then Extract the file (now you will get .tar file) into your PC.
2. Go Setting >Developers option to enable USB Debuging on your Galaxy S3 and then Power off your Galaxy S3.
3. Press your Galaxy volume Down+ Power Button + Home Button to enter Downloading Mode.
4. Open Odin (download Link) on PC, then connect your S3 to PC via USB connect USB.
5. Make sure Odin Detect your Galaxy S3 (How to know).
6. Press Odin PDA, then select the downloaded firmware (.tar).
7. Now click Odin Start button to Flash the firmware into your galaxy S3.
8. That all! Your Phone will reboot once the firmware complete flash into your S3.

greetings deta - gsm.
How To Update Rooted Galaxy S3 To Official Android 4.1.1 Firmware
Finally, Samsung has rolled out official Android 4.1.1 Jelly Bean to Singapore
and Malaysian users. This is an official firmware for Galaxy S3
GTi9300, so you can get the update via OTA by go to Settings> About Phone>System Updates >Check for updates. Besides this, you can also update your Galaxy S3 via Samsung Kies application.

Step 2: On your phone, go to Settings> About Phone>System Updates >Check and download for updates.
Method 2: Update for Rooted Galaxy S3 GT i9300 to Android 4.1.1 I9300XXDLJ1 Jelly Bean via Samsung Kies.


[Read More...]
But, if you have
tried both of the methods as above and still cant get the Android 4.1.1
Jelly Bean Update notification, then how? Yes, if your phone has been
rooted, then may be you unable to receive the latest firmware
notification.
To update latest official firmware to your rooted Galaxy S3- Firstly, you may try the method as i has mentioned as above. But, if you still failed to get official firmware after tried via OTA and Samsung Kies update, then you need follow the method as below to update your Galaxy S3 official firmware:

Method 1: OTA Update for Rooted Galaxy S3 GT i9300 to Android 4.1.1 I9300XXDLJ1 Jelly Bean.
Step 1: Unroot your Galaxy S3. There have several method to unroot your Galaxy S3.
Here I have temporary unroot my Galaxy S3 via OTA RootKeeper
application. This method to temporary unroot your galaxy S3 is same as
what I have shared with you how to unroot Galaxy Note 2. So refer link here to get more info on how to unroot your Galaxy S3.
Method 2: Update for Rooted Galaxy S3 GT i9300 to Android 4.1.1 I9300XXDLJ1 Jelly Bean via Samsung Kies.
Step 1: Yes , you need unroot your Galaxy S3.
Step 2: Refer tutorial here on how to update firmware via samsung kies application.
Method 3 : Update Galaxy S3 GT i9300 official Android 4.1.1 I9300XXDLJ1 Jelly Bean via Odin.
Step 1: Before download firmware, you can refer here
on how to check and read the Samsung Official firmware code version
that support your phone.Example, i download the firmware- “
I9300_XME_1_20121015174658_4or3ody16y.zip” form here.
Then Unzip the firmware and place into your desktop or computer. Unzip
this file and you will get
“I9300XXDLJ1_I9300OLBDLJ1_I9300DXDLI5_HOME.tar.md5”
Step 2: On your phone, go to Setting>Developers Options to enable USB Debugging. Then power off you phone.
Step 3: Press volume down Button + Home
Button + Power Button, and you will boot into download Mode warning
page. Then press volume up to boot into downloading Mode.
Step 2: Download Odin.
Step 3: Open Odin. Then connect your Galaxy S3 to computer via USB cable.
Step 4:
Odin application will detect your Galaxy S3. If Samsung not detect your
Galaxy S3, then make sure that your computer has installed Samsung Kies application and your Kies application is not open when you open then Odin application.

Step 5: Click on the Odin PDA button and then choose “I9300XXDLJ1_I9300OLBDLJ1_I9300DXDLI5_HOME.tar.md5”
Step 6: Click start
button to start flash the Android 4.1.1 I9300XXDLJ1 Jelly Bean into your
Galaxy S3. You Galaxy S3 will automatically reboot once Android 4.1.1
I9300XXDLJ1 Jelly Bean completely flash into your Galaxy S3.

good luck>
Sukses Repair Samsung GT S5570 Auto On
Arti sebuah Judul Samsung Auto On
adalah:
pada Saat dipasang batre Handphone Lansung On / Hidup
ni sollusinya Tinggal Cek Componen yg di beri tanda.

[Read More...]
pada Saat dipasang batre Handphone Lansung On / Hidup
ni sollusinya Tinggal Cek Componen yg di beri tanda.

Sukces Flash Samsung Champ C3303 suddenly stopped
The first damage the touch sreand not functioning properly
Replace with new The results also no change .
Curious ahirnya I took the decision to upgrade again ( Flash )
In the process of flash even stopped in the middle of the road .
Eventually I Try Flash As a result the same one that is stopped in the
middle of the road / do not want to finish .
See the picture below fail :

various ways in z3x tab is in the settings, but the same results .
Whereas previously only for flash HH Lancar2 other .
Well after an event like this so deat HH 's for sure .
for that I am trying to use the free tool
How to use tutorial :
SRS One-Click-Root 2.3
SRS One-Click-Root 2.3

100 % WORKING TESTED BY MOHSIN
DOWNLOAD LINK :::SRSRoot-Setup.exe
MOHSIN FROM SOUTH AFRICA
DONT FORGET TO THANX
100 % WORKING TESTED BY MOHSIN
DOWNLOAD LINK :::SRSRoot-Setup.exe
MOHSIN FROM SOUTH AFRICA
DONT FORGET TO THANX


S5300 Samsung Galaxy Pocket Rooting Guide procedure
S5300 Samsung Galaxy Pocket Rooting Guide Procedure for UNLOCKING purposes
PROCEDURE
1. download here: S5300 ROOT FILE
2. copy the file in memory card and put the memory card on the phone.

3. go to menu then open "MY FILES"

4. go to "external_sd" then open

5. touch and hold on the "update.zip" on the screen to show the COPY menu

6. click or touch "COPY"

7. click "paste here" on phone memory

8. now the "update.zip" is on the phone memory

9. now power off the phone then hold "volume up" and "center button"
and press the "power switch" release all button after 5 to 10 secs. after phone powering.

10. push volume down to select "apply update to sd card" then click center button

11. select "update.zip" then press center button to start rooting

12. press center button to "reboot system now"

13. now phone is rebooting

The phone is now rooted and ready to unlock with your GADGETS that support S5300.
THANKS for reading.
HAPPY UNLOCKING TO ALL.
PROCEDURE
1. download here: S5300 ROOT FILE
2. copy the file in memory card and put the memory card on the phone.
3. go to menu then open "MY FILES"
4. go to "external_sd" then open
5. touch and hold on the "update.zip" on the screen to show the COPY menu
6. click or touch "COPY"
7. click "paste here" on phone memory
8. now the "update.zip" is on the phone memory
9. now power off the phone then hold "volume up" and "center button"
and press the "power switch" release all button after 5 to 10 secs. after phone powering.
10. push volume down to select "apply update to sd card" then click center button
11. select "update.zip" then press center button to start rooting
12. press center button to "reboot system now"
13. now phone is rebooting
The phone is now rooted and ready to unlock with your GADGETS that support S5300.
THANKS for reading.
HAPPY UNLOCKING TO ALL.
Samsung E1282T Unlocking with Flashing..Done.
Samsung E1282T Unlocking with Flashing...

Download Link
Download Link
Code:
1. Choose one(Bautrate: 921600)
NOR_FDL : nor_fdl.bin
NV : nvitem.bin
PS: SC6530_sc6530_samsung_EricPlus_stone.bin
MMICSC: mmi_res_128x160_csc.bin
2. In Calibration part, click "uncheck" and push OK button.
3. first press start buttonand and press ok key among navi-key after inserting battery
and Usb cable connection
4. Confirm the downloaded version name and etc. :
*#1234#
Full Reset :
*2767*3855#
Samsung Check Fus Downloader v 2.1.0.0
Samsung Check Fus Downloader v 2.1.0.0
Version History
Official support site The webversion of Check Fus 2.0Also known as
(click to toggle older news)
2011-09-27
As many of you probably have noticed, @SamKiesUpdates have begun tweeting firmwares found using TestMode in Kies. I will add ability to download TestMode, enable TestMode in Kies and the next version will also have a sorted list.
But what is TestMode?
TestMode is a mode in Kies which enables you to install a not yet (but soon to be) released firmware and is only intended to be used by advanced users! Not for the regular user.
As promised, here is the new version: Check Fus Downloader 2.1.
v.2.1 - File version 2.1.0.0
* Added ability to download TestMode firmwares
* Let's you enable TestMode in Kies (Please report on XDA if it works)
* Sorted model list
Official support site Check
The webversion of Check Fus 2.0
Screenshots


[Check Fus Downloader] V2.1 More Info Inside The Thread !

Easy Method to download the latest update of samsung firmware just with one click ,
Check Fus Downloader 2.1
More info visit : The webversion of Check Fus 2.0
Version History
- Samsung Check Fus Downloader v 2.1 (File version 2.1.0.0)
- Added ability to download TestMode firmwares
- Let's you enable TestMode in Kies (Please report on XDA if it works)
- Sorted model list
- Samsung Check Fus Downloader v 2.0 (File version 2.0.0.1)
- Fixed high memory consumption when downloading files.
- Should work in Win XP now
- Bada support
- Not limited to the preset list anymore (Advanced tab)
- Decrypt a already downloaded firmware
- CRC check a already downloaded firmware
- Bug fixes and a lot of code clean up.
- Icon
- FusCipherUtil.dll no longer needed for running Check Fus Downloader
- DepositFiles
- Download CheckFusDownloader_v2.1.rar for free on uploading.com
- Samsung_Check_Fus_Downloader_v_2.1.0.0.rar download Extabit.com - file hosting
Official support site The webversion of Check Fus 2.0Also known as
- Samsung Check Fus Downloader / Samsung Check Fuse Downloader
- SamsungCheckFus / SamsungCheckFusDownloader / hidswver PDA CSC PHONE
(click to toggle older news)
2011-09-27
As many of you probably have noticed, @SamKiesUpdates have begun tweeting firmwares found using TestMode in Kies. I will add ability to download TestMode, enable TestMode in Kies and the next version will also have a sorted list.
But what is TestMode?
TestMode is a mode in Kies which enables you to install a not yet (but soon to be) released firmware and is only intended to be used by advanced users! Not for the regular user.
As promised, here is the new version: Check Fus Downloader 2.1.
v.2.1 - File version 2.1.0.0
* Added ability to download TestMode firmwares
* Let's you enable TestMode in Kies (Please report on XDA if it works)
* Sorted model list
Official support site Check
The webversion of Check Fus 2.0
Screenshots

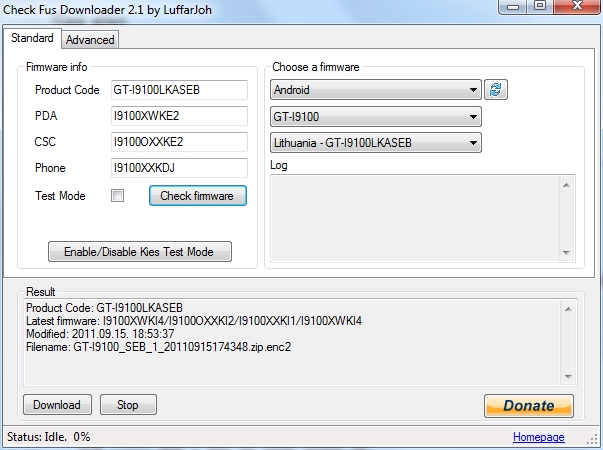

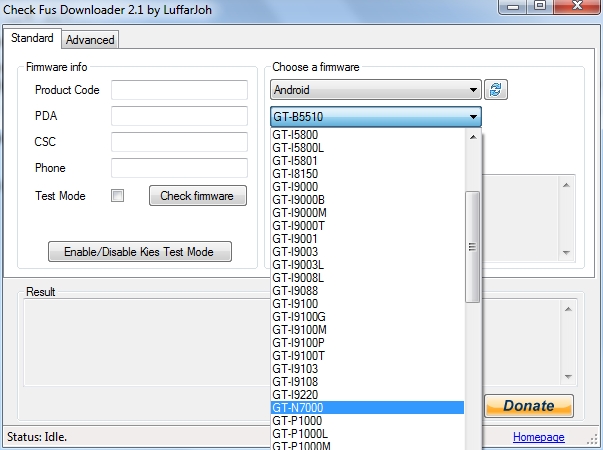
[Check Fus Downloader] V2.1 More Info Inside The Thread !
Easy Method to download the latest update of samsung firmware just with one click ,
Check Fus Downloader 2.1
More info visit : The webversion of Check Fus 2.0

Subscribe to:
Posts (Atom)


 Posts
Posts


