FIRMWARE OPPO R831K ORIGINAL R831K_11.A.15_INT_015


Cara Flash oppo R831k
Download dulu firmware Firmware Oppo R831K lalu simpan di memory
   Matikan HH lalu masuk ke menu recovery dengan cara menekan Tombol Power + Volume Down (-) secara bersamaan.
Setelah itu akan muncul tampilan Tulisan English
        Lalu pilih Wipe Data and Chace kalau muncul pop up pilih aja Yes.
      Otomatis kembali ke menu dasar kemudian Pilih instal from sd, lalu  cari file yang di download tadi


[Read More...]


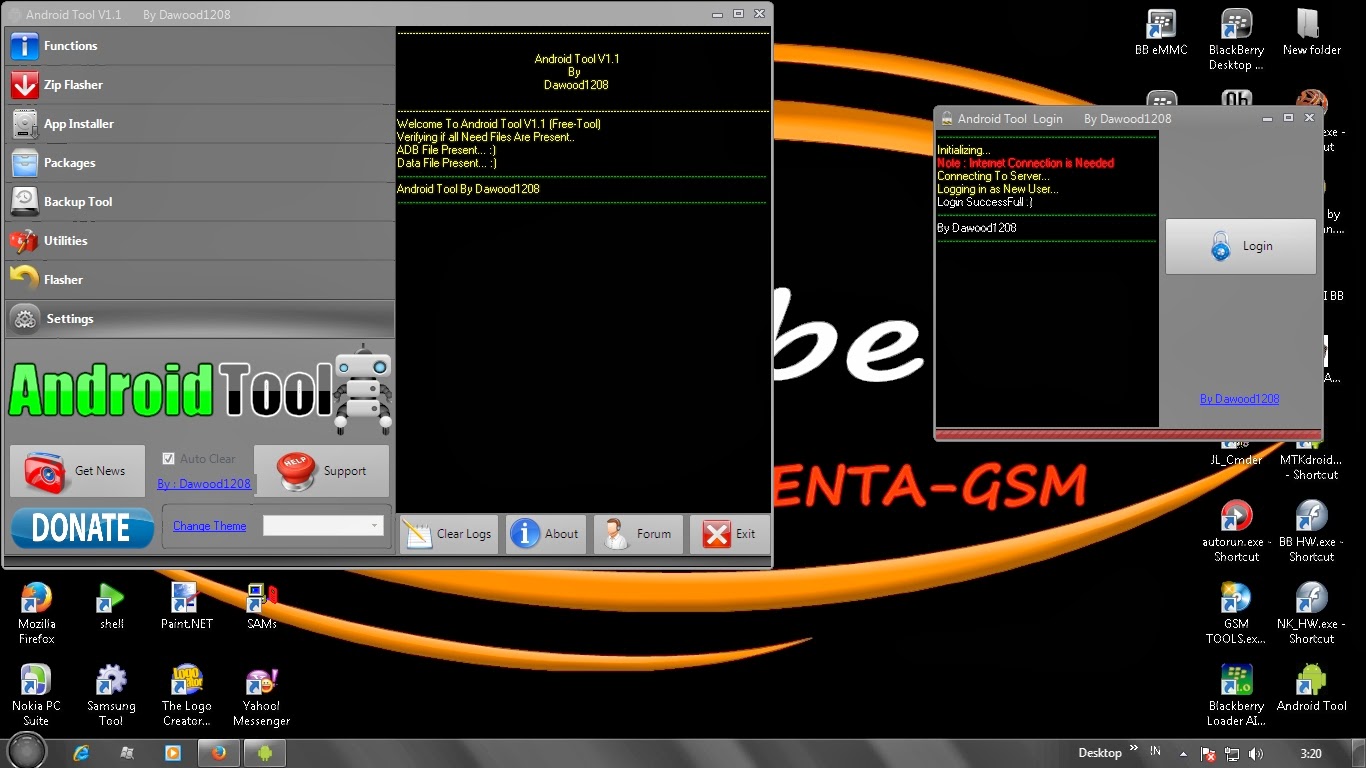
Android Tool V1.1 useful software use for free


Android Tool V1.0 By Dawood1208

.) One click
Start/kill Adb server
List Devices
Reboot
Go Recovery
Go Download
Wipe Data in Adb/Fastboot Mode
Remove Password (Root Needed)
Remove Pattern (Root Needed)
Remove Gmail Account (Root Needed)

.) Zip Flasher
Select Zip File And send automatically to sdcard
And Send phone to Recovery Mode With instructions

.) App Installer (one click)
Select apk file and it will install

.) Utilities
Full Key Tool ( Usefull incase your phone button not work :-O
Root Checker
Permission Fixer
.) File Manager
Shows All installed Apps
.) Flasher (Fastboot Mode)
One Click Flash splash\Hboot\Recovery\Radio


DOWNLOAD LINK
[Read More...]


How to Upgrade Samsung Galaxy 551 I5510 to Android 2.3.6 Gingerbread Firmware I5510XWKPH


Step by Step :

  1. Download first : Samsung Galaxy 551 / I5510 Download Program - USB cable.
  2. Download the driver used his : Samsung Galaxy 551 / I5510 USB Drivers.
  3. Her Firmware Download : Samsung I5510 / Galaxy 551 Firmwares
  4. Prepare a Micro USB data cable , can use a data cable nokia E63 or Blackberry 8520
  5. Extra semua file hasil download tadi dan install driver nya
  6. Open Odin Multi Downloader v4.34
  7. Click on OPS and enter the file : CALLISTO_v1.0.ops
  8. Click the Boot , enter the file : I5510xxxxx_BOOTLOADER_CL872686.tar.md5
  9. Click the Phone enter the file: I5510xxxxx_amss_phone_CL776067.tar.md5
  10. Click the PDA file enter : I5510xxxxx_PDA_CL872686.tar.md5 
  11. Click on CSC enter the file : GT-I5510-CSC-MULTI-Oxxxxx.tar.md5
  12. Put batrei on Hape 
    Press the Q key on the phone is not released followed press the POWER button to exit the screen cellphone Downloading.
     Make sure the phone sdh terdetekti can be seen in column Comport Maping
    Let the phone software goes to completion ( does not take long , only about 2 minutes )
    completed.

    Do full factory reset, this is useful if you'll experience bootloops after flashing. Master reset by code *2767*3855# or via recovery mode pressing the "T key and Power key" will get you in recovery mode just scroll down to Wipe Data/Factory reset.
    Samsung Galaxy 551 I5510 Recovery mode
[Read More...]


mSpy Review | Cell Phone Tracking Software for iPhone


Today I am here with a new app called mSpy which is a revolution in the field of mobile spying. There are many online companies outside but mSpy is truly one of the best among them. Through the use of the most reliable mobile monitoring application you are able to monitor each and every activity happening on every smart phone you’ve downloaded the app on

You must have heard about “mobile tracking software” and “spy software”: this software is widely used in order to track on your friends or relatives or children. So here you need mSpy app which you can download from the official website http://www.mspy.com/. It is one of the best and most popular apps in the mobile tracking industry.

mSpy is cell phone spy software that silently monitors any Apple, Android, Windows or Symbian based smart phones. Once installed on the smart phone it gives access to the targeted phone’s text messages, e-mails, call history, call recordings, web history, photos and now it has the ability to monitor Skype and WhatsApp too.

 
mSpy provides wide ranges of services worldwide and most of its users are also satisfied with it. With mSpy cell phone software you get the best in class tracking solution, multi language 24×7 support, flexible payment options and guaranteed results.

 Some Features Offered By mSpy

 mSpy offers a number of features that helps you in day-to-day life. Here are some of the major features:

 Call logs. With the help of mSpy you can spy on the daily incoming and outgoing calls of the current devices being monitored. It also gives you the privilege to listen to the live (in real time) or recorded call conversations.

 Email logs. mSpy allows you to read the incoming and outgoing mails of the person whose device you are spying on. You will be able to see the complete information regarding the date, time and email address of the sender/recipient.

 Web history. It enables you see all the URLs visited by the targeted smart phone users. It also allows you to see the bookmarked websites.

 Controlling Apps. With mSpy you can be aware of every app which is downloaded, run or wiped on the targeted cell phone. These features ensure you that no inappropriate activity happens on the targeted device.

 Remote locking. Now you can remotely record the device just by sending a command through your online control panel. This command is reversible too and you can easily unlock the device whenever you want.
 Device Information. In addition to monitoring the mobile activities mSpy allows you to view other important information of the targeted device.

 Device Information. In addition to monitoring the mobile activities mSpy allows you to view other important information of the targeted device.

[Read More...]


All Samsung android flashing software ODIN in one exe


All Samsung android flashing software ODIN in one exe


DOWNLOAD HERE
[Read More...]


Leaked Android 4.2.2 Firmware for Samsung N5110 Galaxy Note 8.0 Wi-Fi is Online


Leaked Android 4.2.2 Firmware for Samsung N5110 Galaxy Note 8.0 Wi-Fi is Online


SamMobile.com brought us a new leaked firmwware, This time the leaked firmware came to the Samsung Galaxy Note 8.0 Wi-Fi N5110 model, Sammobile.com flashed the firmware to a device to check it and the team reported that after updating the Galaxy Note 8.0 Wi-Fi firmware to Android 4.2.2 the device looks a lot faster with more battery lifetime.


You can download the new leaked firmware


N5110XXCMG2_N5110OXACMG2_OXA
__________________

[Read More...]


Hard Reset Samsung I8750 Ativ S Using its Hardware Buttons


Hard Reset Samsung I8750 Ativ S Using its Hardware Buttons


Samsung I8750 Ativ S Hard Reset Steps:

  1. - Make sure that the device battery is fully charged, Or at least it is at 90%  of charging level.
  2. - Turn off the device, Press the Power button for some seconds and then scroll down to turn off option.
  3. - Wait for 10 seconds to make sure that the phone is off.
  4. - Press Volume Down key and Power key to turn the phone on.
  5. - Keep pressing the Volume Down key and release Power key.
  6. - When the device boots with exclamation mark " ! " on screen release Volume Down key. - Now you should press some keys in the following order:
  7. Press Volume Up key > Press Volume Down key > Press Power key > Press Volume Down key
  8. - After pressing the above keys the operation will start in a moment, So just wait for it to be finished.
[Read More...]


How To Format MTK 6573,75,77 And All Android


How To Format Mtk6573,75,77 And All Android Mobile Phone
1- open volcano -> mtk
2- select boot 7.1216 OR 7.1304
3- Tick read info
4- Tick usb mode
5- Insert battery into phone
6- Press Run button
7- inset usb cable
There is some boot keys for these Android phones
Some phones you need to press and hold these keys before plug usb cable
Vol +
Vol -
Vol + and Vol -
Camera key
Vol - and power button
Vol + and power button
Vol - and vol + and power
camera key and power
camera key and vol +
camera key and vol -
power button


Read info
SEE FORMAT ADDRESS AND LENGHT


[Read More...]


Download Driver All Mtk Android


DRIVER ALL MTK ANDROID

SUPPORT FORR

WINDOWS 32 AND WINDOWS 64

Download All Driver Androit MTK
[Read More...]


Hard Reset Advan T1c Hank Logo


langkah- lagkah hard reset
  •   Pastikan batrai advan vandroid dalam kondisi full
  •   Tekan tombol power
  •   Setelah ada tanda getar kemudian tekan tombol volume (+)
  •   Jika sudah tampil logo advan lepas tombol power
  •   Pastikan tombol volume tetap di pencet sampai keluar gambar android
  •   Kemudian pilih wipe data/factory reset engan tombol volume (-)
  •   Setelah proses wipe selesai pilih reboot system now

[Read More...]


Xperia phones stock, root, all in one


Sony experia phones can be flashed by so many tools including free tools available on the internet.
A sony Android phone even in dead condition if can be detected by pc should be able to flash via one of the following tools provided the problem is software related.
I will be listing only free tools as professional tools have their respective sections.


Flash original Images (Android 1.6, 2.1, 2.3 Images)
Root your phone
Install Recovery, Busybox, custom kernels
Clean your Rom (remove /system/apps apps of your choice) (Be careful, unless you really know what you do, do not modify the default list. This can make your phone stuck at the SE Logo)
Clear dalvik cache
Optimize (install of JIT v2) (Disabled in 0.4, will readd it as a plugin for 2.1 phones only)
Customize (installs apps found in the custom/apps folder of the flashtool)
Clean uninstalled (remove any references to system apps removed in the Clean (root needed) step)
Edit any text file on the device
Rebrand your device


Accept all the prompts and once finished load flashtool


Now select flashmode
Now click the "..." button


Note: The downloaded firmware has to be placed in the firmware folder in flashtool.

browse to the folder where the FTF is and press "open"
Now click the "..." button


Switch your phone off and press and hold the back (volume down on some phones) button while connecting usb lead (Green LED)
It should start flashing and once done will say "Complete", Reboot and your done.
Congratulations you have now successfully flashed a FTF file using flashtool
.

List of some stock firmwares for xperia phones:

Xperia U
xdafileserver - for your daily dosis rom!


xperia sola
http://www.xdafileserver.nl/index.ph...a%2FSTOCK+ROMS 

xperia p
http://www.xdafileserver.nl/index.php?dir=Sony+%28Ericsson%29%2FSony+Xperia+P%2FSTOCK+ROMS

xperia s
http://www.xdafileserver.nl/index.php?dir=Sony+%28Ericsson%29%2FSony+Xperia+P%2FSTOCK+ROMS

 Flashing using pc companion

The official sony pc companion can also flash devices in bad state as long as flash mode is detected by pc.
simply download and install pc companion from the link below
http://www.sonymobile.com/gb/tools/pc-companion


lick on support mode


click start under phone software update


click repair my phone


A LIST OF FLASHTOOL FIRMWARES.


XPERIA X8/2.1.1.C.0.0
Click here

SOME TFT FIRMWARES CAN BE FOUND ON THIS LINK.
FEEL FREE POST ANY FIRMWARE LINK YOU HAV TO HELP USERS
Firmware & Basseband Click here


[Read More...]


How to Update IMO Z5


TERMS OF PERSONALLY INSTALL :
PLEASE DO FOR BACKUP DATA FIRST.BECAUSE OF DATA OR SOFTWARE IS INSTALLED  D is removed ,
IF THE INSTALL DO YOURSELF, THEN THE OFFICIAL WARRANTY NOT APPLY AGAIN .

 A.Introduction :

 A few weeks ago , was formally inform Admin IMO through this group , and in the official discussion forums on its website .As promised from the Admin IMO will support the provision of GSM and CDMA 3G modem finally realized.

 B.Introduction :

1.Download Live Suite for flashing ( insert ) program ini.Silakan firmware download at :
 
2.Download Stock Firmware ROM original , needs to know before selecting the download link below,
Admin IMO informed :
1.If you are behind Tablet IMO Z5 has a sticker that reads a white base color IMEI information please download link bluetooth version 5875Y ,
 
2.If you are behind Tablet IMO Z5 has a sticker that reads information IMEI gray base color silver please download link bluetooth version 5875
 
 3.This provision applies because a different bluetooth versions , which, if you choose the wrong firmware , the later can be the Bluetooth function is not working .
 
So make sure to correctly
Please download , if you already understand:
 
Bluetooth version 5875Y  ( white label IMEI )
JHZT-A088-Z5-A-M1190-5875y-V1.2-20120710_113830.zip.002
http://www.mediafire.com/?j3ximnbx6d6t3zm
JHZT-A088-Z5-A-M1190-5875y-V1.2-20120710_113830.zip.003
http://www.mediafire.com/?d134ua3cup61zdk  

Bluetooth version 5875  ( Silver label IMEI )
JHZT(Robot)-A088-Z5-A-M1190-5875-V1.2_20120713_102746.zip.001
http://www.mediafire.com/?f94l3cq3g0v2v94
JHZT(Robot)-A088-Z5-A-M1190-5875-V1.2_20120713_102746.zip.002
http://www.mediafire.com/?td5mejsa5ka0cpx
JHZT(Robot)-A088-Z5-A-M1190-5875-V1.2_20120713_102746.zip.003
http://www.mediafire.com/?d21422plpfv157n

3.Later we will get 3 parts of the file with extension .001 , .002 , .003 .

4.Place the three files were in a folder.

5.Bring three files with File Splitter and Joiner which can be downloaded at :

6.Will also get an image file as an example :
JHZT-A088-Z5-A-M1190-5875y-V1.2-20120710_113830.img
 atau
JHZT(Robot)-A088-Z5-A-M1190-5875-V1.2_20120713_102746.img

C.Let Moving to Pray to be Successful:
 Method I:

1. Ensure readiness: Firmware File Image, Live Suite, USB Cable, Courage, Perseverance, and Patience

2. Previous Backup all your data with third party applications such as Titanium Backup or World Clock Mod Recovery.

3. Open LiveSuit.exe derived from the Live File ektrasi Suite.rar

4. Click the icon that first, then browse dancari where the firmware file is located and click Ok.

5. Turn off Tablet IMO Z5 and never turned back on, plug the USB cable while you press and hold the power button and vol + about 10-30 seconds.

6. Live Suite program detects the presence of Z5 when finished installing the driver, if you have not please check in device manager, is there a device called Android ADB?

7. The question arises as to format, please format if you want a really fresh as new. If you do not select Upgrade (Application installed morbidly lost.)

8. The process lasts up to 100%, if the program is not responding promptly dislodged Z5 cable and start the program again.

9. If it is 100%, wait until Z5 bring Animationnya Boot logo IMO and will turn into Android that Mengelengkan head, not David Villa lg.
 
 Method II:
This method is more simple.

1. If you have an SD Memory Card Class Medium (6-8) or Tinngi (10) can use this alternative.

2. Insert your SD Card into your computer through a card reader or through direct Z5 USB storage mode.

3. Copy the firmware image file to a folder td outermost dr memory card SD Card (Root Folder).

4. Change the name of the file to be update.img

5. Mount or Insert your SD Card again.

6. Turn off your Z5.

7. Pray turn Z5 with AMDA.

8. Later there will be a question whether you want to upgrade select yes.

9. The upgrade process is running, please continue to pray.

10. If it is 100%, wait until Z5 bring Animationnya Boot logo IMO and will turn into Android that Mengelengkan head, not David Villa lg.


[Read More...]


Battery Calibration CWM and App – Tutorial


Hello all,
Today we will cover the most discussed but still challenging for many users who are using  CyanogenMod 7.1 v1.4. And that is “How to calibrate battery?”
Everyone wants their battery with optimal charging capacity and long lasting especially we are using custom roms.
First of all, Why we need battery calibration?

Well, If you have installed or upgraded CyanogenMod 7.1 V1.4 from V1.3 then it is using new kernel battery driver  which requires  to remove old batterystat.bin system file  in order to regenerate  new batterystat.bin system file by OS itself which will have updated battery information to drive it.


Second question may come in your mind, why batterystats.bin file? What’s in that? 

batterystats.bin file store battery storage information and reflect to battery performance. Symptoms of a bad batterystats.bin include poor battery life, excessive battery drain, phone is dead within hours or minutes of charging, battery will not fully charge, etc. These problems occur as the batterystats file may not know the correct max charge of the battery, or the min charge of the battery, and thus your battery will be artificially limited between what the OS thinks is the entire battery when in fact the batterystats.bin is not telling the whole story.
This operation you can do from CWM recovery manager. Just follow to below steps.

Get into CWM recovery mode.  and follow instruction as shown in screenshot?

Another related app we have is “Battery Calibration”. You can download it from market for free. It basically does same job as mentioned above but only thing it dosn;t require any boot. Just look at screenshot it has pretty well defined instructions. Just follow it and then you good to go with your battery.

Other thing we recommend is do battery wipe just once when you upgrade or fresh install ROM and perform charging-discharging  cycles 3-4 time.
(Note: Charging -dischargning cycle require complete draining of battery untill 0% and charge it to 100% without any break if you want optimal performance of battery )
Hope you get better battery performance. Let us know your feedback, experience , question at below in comment section.


[Read More...]


CyanogenMod 7 Installation Guide for G5 Users


1 – Download CyanogenMod ROM

Links can be found on ROM Manager or Goo-inside.me, depends on Release. If you can’t find the link please read CyanogenMod 7 Development Thread.

1. Download the base package named update-cm-20120X0Y-MADTEAM-galaxy5-signed.zip
2. Download latest hotfix package for the same base package version, named galaxy5-vX.Y-hotfixZ.zip (if exists)

3. Download Google Apps package, named gapps-gb-DATE-signed.zip

4. Copy all these Downloaded files to your Phone’s SD Card.

2 – ClockworkMod Recovery

ClockworkMod – also known as Clockwork and CWM – is a custom recovery for Android phones and tablets that allows you to perform several advanced recovery, restoration, installation and maintenance operations on your Android device that aren’t possible with the stock recovery.
Download Flash Tools and ClockworkMod Recovery:


1. Download ODIN Multi Downloader v4.28
2.Download EUROPA_v1.0.OPS (ODIN Partition Script)
3. Download ClockworkMod v5.0.2.7 (unofficial Port v0.7 by psyke83) for Galaxy5

Flashing ClockworkMod Recovery on Galaxy5:
Reboot the device into Download Mode by holding Volume Down + Middle D-Pad button + Power Button together.
Galaxy 5 in Download Mode:

1.Connect Galaxy 5 to your PC using Data Cable (Use Original Samsung one!)
2.Run ODIN Multi Downloader v4.28
3.Click on [OPS] button and browse for EUROPA_v1.0.ops file.
4.Check “One Package” option.
5.Click on [One Package] button and browse for “ClockworkMod-Galaxy5-v0.7.tar”
6.No Debug mode.
7.Click on [Start] button and wait until you see RESET or PASS above timer. After that you can Disconnect Galaxy5 from PC.
 8.Phone will automatically Reboot into ClockworkMod that you have flashed.
Galaxy 5 in ClockworkMod Recovery:
 

 3. Installing CyanogenMod ROM

 
1. Now in ClockworkMod Recovery, use D-Pad buttons to navigate Up/Down.
2. If you are upgrading from Eclair or Froyo, you absolutely must perform a data wipe: Select wipe data/factory reset and confirm the operation. Note that you will lose all of your user data, so be sure that you have performed a backup. Otherwise, skip to the next step.
3. Choose the option install update from sdcard -> choose zip from sdcard. You will see the two (or three) .zip files in the list, which you have copied before.
 4. Select the base package named update-cm-20120X0Y-MADTEAM-galaxy5-signed.zip and scroll download and confirm it.
5 You must install the two (or three if you have hotfix) files in this exact order:

  • The base package named update-cm-20120X0Y-MADTEAM-galaxy5-signed.zip
  • The Google Apps package, named gapps-gb-DATE-signed.zip
  • The latest hotfix package for the same base package version, named galaxy5-vX.Y-hotfixZ.zip
Note : If you are upgrading from an older CyanogenMod version, you always need to re-install the Google Apps package, even if you had previously installed it.

 6 Once the packages are installed you can reboot the phone by selecting reboot system now option.
 7 Now you will see new CyanogenMod boot animation, the first boot may take longer than normal, due to Deodexing.


good luck
[Read More...]


Flashing And Upgrade Samsung Galaxy Mini S5570i Pop Plus


Flashing S5570i Samsung Galaxy Mini Pop Plus I have proved myself right where the user's smartphone , it's time for Smartphone firmware is still hard at looking for, but with a strong passion I finally found a suitable firmware
 
 
How about the same as the other Samsung Galaxy Mini Firmware and the only other ingredients are different.
 
 
You can see for yourself by mengukuti tutorial below but before I am not responsible for damage or loss of data on your smartphone.
 Here's how to Flashing / Upgrade Samsung Galaxy Mini S5570i Pop Plus :
 Prepare the following ingredients :
 
1.Firmware ( S5570IXXLC3 )Download Here
 
2.File Pit ( Tassve_0623.pit ) Download Here
 
3.Odin Multi Downloader 1.84 Download Here
 
4.Samsung USB ( when the computer detect the smartphone does not need to install it ) Download Here
 
After the above material was prepared in the download follow the steps below:
 1.Extract the materials that you have downloaded above
 2.Shut down and restart her Hp by pressing the Power + Home + Volume Down simultaneously 
 
 
3.Then came Downloading mode as shown below


4.Connect Samsung Galaxy Mini to the computer via USB cable
 
5.Open Odin and wait until Odin detect Samsung Galaxy Mini USB cable , there are 6 fields to enter data extracted from its Firmware :


 Guide How to use:
Press PIT select tassve_0623.pit
Press BOOT select DefaultCalDataWithBoot_S5570IXXLC3_REV03.tar.md5
Press PHONE select MODEM_S5570IXXLC3_REV03.tar.md5
Press PDA select PDA_S5570IJPLC1_REV03.tar.md5
Press select GT - S5570I CSC - MULTI - CSC - OJPLC1.tar.md5
EFS leave it blank


6. Klik Start dan tunggu proses nya:


7.If Successful you will appear blue PASS writing as shown below :


[Read More...]


Tutorial Flashing SAMSUNG GT- i5503 And GT - i5500 Android


Flashing Tutorial SAMSUNG GT - i5503 or GT - i5500 Android


CHAPTER I.  Flashing equipment
Preparation Hardware:
o Original Mini - USB Cable
o What is clear for Galaxy 5 GT - i5503 model's or GT - i5500
o PC or Laptop


Flashing Preparation Software:
o Samsung Usb Drivers
o Odin Multi Downloader v4.28 [ / url ]
o File OPS ( EUROPA_v1.0.ops file )
o Winrar / ZIP / 7zip (need to extract the compressed file )
o Make sure the powersupply G5 filled 85% and a PC Power Supply in good condition .( see also electricity ga jail again ? , like turn on the electricity turned off .. he should not die power / better there UPS )
 BAB. II  Persiapan memulai Flashing
 File Preparation - Files on PC or Laptop:
o Install Samsung USB Drivers (make sure installed properly)
o Creating Folders For File - File Flashing eg GT-i5503
o Copy File "Odin Multi Downloader v4.28.exe" and "EUROPA_v1.0.ops" in Folder GT-i5503
o Install WinRAR or WinZip or 7zip
o Download the firmware or rom and place it in the folder I5503DXJP6.rar GT-i5503
o Extract using WinRAR or WinZip or 7zip firmware or rom I5503DXJP6.rar once extracted open the folder there will be a file I5503OLBJP6.tar
o Now Agan Sista Om aunt had 3 files in Folder GT-i5503 is "Odin Multi Downloader v4.28.exe", "EUROPA_v1.0.ops" and "I5503OLBJP6.tar" 

Preparation Phone Galaxy 5:
o Turn off the G5 agan sista aunt and uncle opened his rear casing G5
o Disconnect the battery then remove the SIM Card and SD CARD Disconnect
o If It Fit again batterynya
o When the G5 is OFF , simultaneously press and hold the 3 buttons are:
o Volume Down + Center button ( the button in the middle of the biggest PAD ) + Power Button
o Press and Hold 3 buttons until the screen appear the words and images G5 " DOWNLOADING "
 CHAPTER .III Started Flashing using Odin Multi Downloader
Part One Flashing :
o If the PC or Laptop SAMSUNG KIES installed , make sure the Kies program its first turn
o Connect G5 ( still in downloading mode) to your PC or Laptop using the Original Mini - USB Cable
 Part Two Flashing :
o Open the folder and run the GT-i5503 "Odin_Multi_Downloader_v4.28.exe" program.
o Make sure the Box "COM PORT MAPPING" YELLOW color, if not, then there is a problem with the USB Cable, Samsung USB Driver or G5 are not in a state DOWNLOADING, so G5 can not be flashed to repair the problem
o Ensure AutoReboot, Protect OPS and One Package in check; Debug Only be unchecked
o Select File OPS: OPS click button. Dialog box will open, navigate to the folder GT-i5503 and then select "EUROPA_v1.0.ops"
o Select the firmware or rom: Click One Package button. Dialog box will open, navigate to the folder GT-i5503 and then select "I5503OLBJP6.tar"
o Before proceeding to pray first and make sure the back steps - the steps above,,
o Click on "START BUTTON" to start flashing. Flashing takes approximately 5 minutes and will be seen flashing in the status message box on the left
o Your G5 will automatically reboot in the flashing, wait until at odin said "PASS" it signifies Flashing process and success. 
Part Three After Flashing :
o After the Flashing Completed and successful ..Mandatory on your G5 HARD RESET using the secret code
o to hardreset , open Dialer Tab (unusual for a call ) and type * 2767 * 3855 #
o This Hardreset process takes a few seconds or minutes ,
o Once the process is complete hardreset G5 G5 automatically reboot and its entry into the homescreen      mode indicates successful
o To ensure that in Flashing Firmware version check phone information ; * # * # 1234 # * # *
 FILE DOWNLOAD LINK HERE:
tool:
File Flash:
Usb Driver:
7zip :


[Read More...]


How To Root Verizon Samsung Galaxy S3 4.1.1 & Install CWM Recovery


The Easiest & Fastest way to root your Samsung Galaxy S3 on Jelly Bean 4.1.1 Firmware. As you may know, Verizon made it harder to root on 4.1.1 but that never stopped developers before now did it? This method is only for the Verizon Galaxy S3 I535 Version. Grab the links you need down below & watch the video above for instructions.

  1. Download and Install Samsung Official USB Drivers - Link
  2. Download and extract ODIN v3.07 - Link
  3. Download the Zip Below
    • For Both Root and Unlocked Bootloader ***RECOMMENDED*** – Download SuperSU + Unlocked Bootloader to your SD Card - Link
  4. Download the VRALEC Bootchain - Link
  5. Download one of the below
    • For ClockworkMod Touch Recovery 6.0.1.2 (Download this to your computer) - Link
    • For TWRP Recovery 2.3.1.0 (Download this to your computer) - Link
  6. Download the VRBLK3 Bootchain - Link

[Read More...]


Update Sony Xperia Ray ST18i with Official ICS 4.0.4 Firmware


Since Sony rolled out the ICS 4.0.3 for their Xperia devices (including Xperia Arc S, Xperia Neo v, Xperia Ray etc). Now the time has come to update them with the latest ICS 4.0.4 which is the leaked version of official update (by Sony mobile). For the time being we’ll be discussing only about Sony Xperia Ray ST18i handset amongst the other. So in due course of article we’ll check out how you can upgrade Xperia Ray (ST18i) firmware to ICS 4.0.4

Let Us Head To The Remaining Portion of This Article Where We Will Be Checking The Following Things :

Essential Steps Before Updating Firmware.
Procedure To Update Sony Xperia ST18i With Official ICS 4.0.4.

Disclaimer : We Have Made This Article Covering Each And Every Part At Our Level Best.In Case If Any Damage Happens to Your Device (It Should not Be), Neither We nor Sony will Be Held Responsible For It.And Also Please Be Noted That Flashing Firmware May Void Your Device’s Warranty.So Flash It At Your Own Risk.

Essential Steps Before Updating Firmware:

You Must Enable USB Debugging By Checking the Box in your device by Following the Path Below:

Settings -> Applications -> Development -> USB Debugging

It will highly Recommended to Backup all Your data Stored in your phone So as to Restore it back just in case If You Lose or Corrupt the Data During this Process.

Your Device Must be Charged up to 70% or Above Battery Level to Ensure that Your Device should not be Turned Off During this Process.

It will be Recommended to Temporary Disable Security Tools as well as Antivirus Installed on your Computer as This might Interrupt the Process.

By Assuming that you have followed all the instructions mentioned in Essential Steps Before Updating Firmware, You are Now Ready to Move to Rest Part of The Article Where We Will be Checking That how to apply ICS 4.0.4 Firmware Update in Xperia Ray.

Procedure To Update Sony Xperia ST18i With Official ICS 4.0.4 :

  • Firstly You Need To Download The Two Files Which is Mentioned Below :

  1. Xperia Flashtool.
  2. Xperia Ray ICS 4.0.4 Firmware Package. | 190.25 MB

Install Flashtool Which You’ve Just Downloaded In Your Computer (For You Convenience, It is Recommended To Install Flash Tool in C: Drive).

Extract Xperia Ray ICS 4.0.4 Firmware Update Package in Your PC, You’ll Get .ftf File.

Navigate C: –> flashtool –> firmwares Directory.Delete All The Data in That Directory If It is Present Over There.

Copy/Move The Extracted Firmware Package File (.ftf File) In The C: –> flashtool –> firmwares Directory.

Now We’ll Proceed To The Actual Firmware Updating Procedure In Our Further Tutorial.

Open Xperia Flashtool Which You’ve Just Installed.Select Flash Option From The Top Corner of The Tool.(Refer The Image Below).


 You’ll Be Ask To Select Either Flash Mode Or Fastboot Mode.Select Flash Mode & Press Ok.

 After Selecting Flash Mode, Firmware Selection Window Will Appear.In The Left Side Select ST18i (Version 4.1.B.0.431).

In The Right Side, Tick The Following 4 Options Only.
  1. Wipe data
  2. Wipe cache
  3. Wipe apps log
  4. No Final Verification

 Select/Press Ok. Wait For It To Prepare.Now It will Ask You To Connect Your Mobile, Follow The Steps Carefully & Connect Your Phone.(While Connecting The Device To The Computer, Turn Off Your Xperia Ray. Press & Hold Volume down key & Now Connect It To The PC).

As Soon As Connect Your Device To PC, Flashing Process Should Now Start.Once You See The Flashing Finished Message In Flashtool. Remove/Detach The Device From PC & Wait For The Device To Reboot (First Boot After Flashing Firmware Takes More Time Than The Usual.So Don’t Panic & Be Patient). 

Congratulations ! By This Time Your Sony Xperia Ray Should be Running On Latest Firmware Update of ICS 4.0.4.Now In Case If You Face Any Difficulty While Flashing The Firmware, Do Let me Know In Comments.I Will Be There To Assist You As Quick As Possible.
[Read More...]


Unroot Galaxy S2 I9100G on Android 4.1.2 Jelly Bean Via Stock Recovery [Tutorial]


Samsung rolls out Android 4.1.2 Jelly Bean software update for Galaxy S2 I9100G.

 Samsung has started pushing out the Android 4.1.2 (XXLSR) Jelly Bean update for its second generation Galaxy S series smartphone (model number I9100G), which was first shipped with Gingerbread software and upgraded to Android Ice Cream Sandwich version.

 The Jelly Bean software upgrade bundles an array of new features such as new user interface (UI), TouchWiz Nature UX, improved camera function, new lockscreen, Direct Call, Smart Stay, Pop-up Play, new Widgets from Galaxy S3, Home screen modes, new Notification bar and Google Now. 

The phone loses manufacturer's warranty with rooting, although there are several advantages. Users can gain complete control over the device and will be able to install custom firmwares which carry features that are not found in official builds. However, users can return to their stock firmware by unrooting the phone.   

Senior XDA developer, Ryuinferno, has released a zip file which allows Galaxy S2 I9100G users to unroot their devices. The unroot method, as claimed by the developer, is an easier process wherein users can flash the zip files directly via stock recovery. One of the key features of the zip file is that it can be used to unroot the Galaxy S2 I9100G running on ICS or Jelly Bean version.

 Features of stock recovery zip file :

1) SuperSU v0.99 by Chainfire
2) Busybox v1.20.2 by Stericsion
3) No yellow triangle
4) No increase in binary counters

 Galaxy S2 users who wish to unroot their phones may follow the step-by-step guide below. IBTimes UK reminds its readers that it will not be responsible for any damage to the device. Users are reminded that the zip file works only on the Samsung Galaxy S2 I9100G; flashing this on any other variant may brick the device.

Pre-requisites :

1) Install USB Drivers for Samsung Galaxy S2 on the computer.
2) Enable USB Debugging Mode. [Press Menu>> Settings>> Applications. From there navigate and click on Development option and ensure the USB Debugging Mode is turned on.]
3) Users are advised to make a backup of all data of the phone before proceeding.
4) Ensure that the Galaxy S2 battery has above 80 per cent charge.
5) The device should be factory unlocked. 

Steps to unroot Galaxy S2 I9100G running on Android 4.1.2 Via Stock Recovery :


1) Download SU-BB-Unstaller.zip for Galaxy S2 I9100G to the computer
2) Transfer the downloaded zip file to the external SD card of the phone
3) Disconnect the phone from the computer if it is connected and switch it off completely
4) Place the device into Recovery mode by pressing and holding Volume Up, Home and Power buttons together
5) Using the Volume buttons navigate to 'apply update from external storage' and select it by pressing the Power button
6) Select the SU-BB-Uninstaller.zip
7) Wait for it to finish and navigate up (select "../")
8) Return to the main recovery menu and select Reboot System now to reboot the device
Once the device boots up successfully, you should be having an unrooted Samsung Galaxy S2 I9100G. 
[Read More...]


How to Update Galaxy Note N7000 to Android 4.2.2 Jelly Bean via SlimBean Build 1 ROM [GUIDE]


SlimBean ROM featuring Android 4.2.2 Jelly Bean released for several Android powered devices.

 The SlimROMs team has officially announced the release of SlimBean 4.2.2 Build 1 custom ROM featuring several improvements and customisations. The custom build brings Android 4.2.2 (Jelly Bean) update which Google has rolled out for its Nexus devices.  

SlimBean 4.2.2 Build 1 features
Full JDQ39 (Android 4.2.2) base
Replace cLock widget with Shiny new DashClock
Added slide before unlock
Bring back long press to toggle PW
MMS: Add quick emoji to text input
Phone: Set my phone number
Added Kill App/Expanded Notification shade/Toggle expanded desktop to hardware binds.

Fully configurable advanced reboot toggle
Enhanced circle battery and clock
Camera: Add software HDR Mode
Calendar: Add snooze to events
Enhance T9 and search
Settings: Add forget all networks to Wi-Fi
Notification: Limit notification sounds for interval
Camera: Add animation to mode switch
Sound: Add configurable volume adjust sounds
Notification: Add custom carrier text
Enhance electron beam control
Fixes and optimisations

Fixes
MusicFX FC
Batterybar UI glitch
QuickPulldown flips notification shade
Phantom QuickSettings toggle
Colour picker issues
Recents apps panel bug
Camera not animating
Colour picker in landscape
Recovery touch
Expanded desktop
Contacts call grouping
Alarm FC on update
Notification shortcuts spacing/tablets transitions
Choppy lockscreen on Low-mem HDPI
Lockscreen browser shortcut
Longpress NavBar Home not loading recent apps
Advanced Slim Settings 
Head over to the development page to learn more about the device specific issues.

One such SlimBean ROM is available for the internal version of the first generation Galaxy Note with model number N7000 which is running on Android 4.1.2 Jelly Bean.
Galaxy Note users who are looking to update their devices with the SlimBean Android 4.2.2 Jelly Bean ROM may follow our step-by-step guide below. IBTimes UK reminds its readers that it will not be held liable for any damage to the device. Users are advised to verify the model number of their devices before proceeding since the Jelly Bean ROM works only on the Samsung Galaxy Note N7000.  

Pre-requisites:
1) Install USB Drivers for Galaxy Note on the computer.
2) Enable USB Debugging Mode.
3) Back up all data of the phone. If the device is having a custom recovery installed, then create a backup for the same.
4) Verify that the battery of the Note should be charged above 80 per cent.
5) The device should be factory unlocked.
6) The Galaxy Note should be rooted and have ClockworkMod recovery installed.
7) Perform a Dalvik Cache wipe before proceeding from the recovery mode.

 Steps to install SlimBean Android 4.2.2 Jelly Bean ROM on Galaxy Note N7000:

1) Download SlimBean Android 4.2.2 Jelly Bean custom ROM for Galaxy Note to the computer
2) Download Google Apps package
3) Connect the Galaxy Note to the computer using USB cable. Now copy both the downloaded zip files to the SD card of the phone
4) Disconnect the phone from the computer and turn it off
5) Place the device in Recovery Mode. To do so switch on the phone while pressing and holding Volume Up, Home and Power buttons together
6) In CWM recovery, perform data wiping task. Then using the Volume buttons scroll down to 'Flash zip from SD card.' Press the Power button to select it
7) Once again press the Power button and select 'Choose zip from SD card.' Then locate the Jelly Bean ROM zip file saved on the SD card. Select it using the Power button and confirm installation on the next screen
8) Once the ROM is installed, repeat the procedure to install the Google Apps file


9) After the installation process is completed, return to the main recovery menu and select 'Reboot System Now.' The device will boot now. The step is likely to take about five minutes
Samsung Galaxy Note N7000 should now be updated with SlimBean Android 4.2.2 Jelly Bean custom ROM. Navigate to Settings>> About Phone to verify the software version of the device.

 [Source: Team Android ]


[Read More...]


Return to top of page Copyright © 2010 | Denta GSM